
3-11-1. The Images : a powerful feature to create custom applications
3-11-1. The Images : a powerful feature to create custom applications
The Images are certainly one of the most powerful features of the MUSTIG language. They allow to quickly create custom interactive front panels for your macros as well as interactive, ready-to-print reports or control panels for your applications. See the Tutorial for more detailed information.
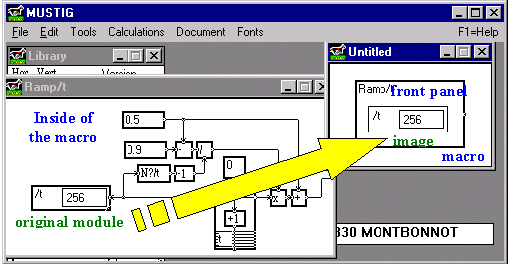
In the MUSTIG language, the Image of a module is what you obtain when you drag a module from a window (for example the inside of a macro) and drop it at a higher level (for example the front panel of the macro). You obtain an image of this module which has more or less the same aspect. It looks as if it was a simple copy of the original module, but in fact it is an active image of the module itself.
This means that, for example, if you drag a scalar input module (module Value) from the inside of a macro and carry it to the front of the macro, you will be able to alter this value directly from the front of the macro, instead of having to really open the macro and find the Value module.
The principle of MUSTIG Images is first shown below through an example. Also see the tutorial for more detailed information. We will then distinguish between two variations of the same concept : the Images of macros and the Image Windows.
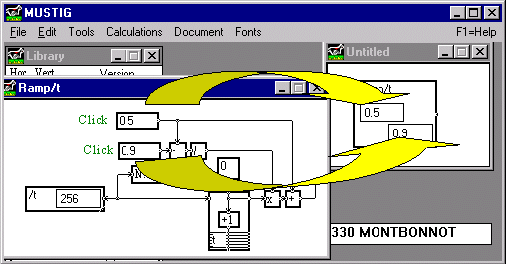
Example of images : Creation of a custom front panel for a macro
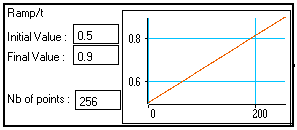
The graph below generates a 256 points ramp signal, i.e. a linear signal between an initial value 0.5 and a final value 0.9 :
What we want to do is create a macro from this program in order to include this algorithm in a personal MUSTIG library.
First, we select this portion of the graph (click and slide the mouse cursor to frame the selected set of boxes) and use the Alt+M shortcut to create a macro. The graph become a single box named Macro n and we are automatically placed in the edition mode to enter a more appropriate name Ramp/t (see Creating a macro) :
![]()
Reminder : The /t sign after the name denotes that the macro creates or operates on a vector depending on a variable named t. If we now want to create a ramp according to a variable named x, all we have to do is change the name of the macro into Ramp/x. All the modules inside the macro depending previously on variable t will not depend on variable x. See Variables if you are not familiar with these notions. Also see Macros in chapter 2.
The macro we have created is much more compact and easy to handle than the set of modules. But each time we want to alter the initial or final value of the ramp, or the number of points of the created signal, we have to explicitly open the macro by double-clicking on it, locate the modules we want to alter and finally edit them using the Shift-Ctrl-Click or Alt-T shortcuts to change their content.
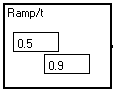
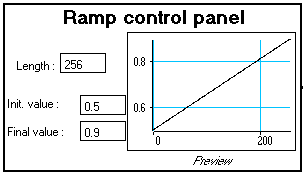
In order to be able to alter the parameters more easily, we are now going to create a front panel for our macro :
The front of our macro should now look like below. You may close the window showing the content of the macro.
Now, enlarge the macro, align both images properly and add text to explain the function of each parameter. This text can be the image of a text imported from inside the macro (in which case a hyperlink is created), or new text added using the Alt+T-Click shortcut (see Creating a text and other related sections).
We finally obtain a more explicit macro :
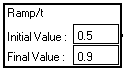
A parameter put in image can be directly altered from the front panel by Shift+Ctrl+Clicking on it.
Locking up the macro to facilitate parameter changes
Altering the parameter is even more simple if you lock up the macro by selecting it and then using the Alt+W shortcut (see (un)locking a macro) : when the mouse cursor is placed on an input module, you are automatically entered in the edition mode if you simply click the module.
Changing several values without recalculating : the TAB key
Each time a value is modified from an image on the front panel, the results that depend on it are recalculated accordingly or reset. However, systematically recalculating the results may be awkward if the calculations take a long time.
When you have changed a value, hit the Tab key instead of clicking outside the window : you are automatically entered into the edit mode to change another image, but the results are not recalculated. Right-click on the wanted results to explicitly recalculate them.
The example in the previous paragraph is one of this type of images. You can "drag & drop" in the front panel of a macro basically any box located at any level inside this macro :
If the box you want to put on the front panel is not located inside the macro, an error message will be displayed :
Respect hierarchy for images
If there is not enough room in the front panel to insert the image of the box, a beep occurs and the operation is canceled.
If the box you want to put as an image on the front panel is located inside a locked macro, you must first unlock the macro to be able to drag the module. You can also select the module with Shift+Click instead of a simple click : this allows you to drag an individual box from a locked macro.
What is the difference between a box and its image ?
The aspect of the image of a box is similar to that of the box itself, except that its outline is thinner and the pins are not shown.
Including the image of a graphical window
The example below is the front panel and the inside of our Ramp/t macro, which has been modified to include the length of the generated signal and a graphical control window on the front panel :

To import the image of a graphical window into a panel :
As this image is an actual hyperlink, all the cursors for setting the graph parameters can still be used (see Adjusting the axes).
3-11-3. Intermediate control panels
Front panels are very useful to comfortably alter the parameters of a macro and view some interesting results. However, as its front panel contains parameters and viewing windows, the macro takes more space in the program window. This could be awkward if the program contains a lot of such macros.
An intermediate possibility is to leave the macro itself unchanged (that is, the box will only contain the name of the macro) and to create an intermediate control panel. This intermediate panel appears only when a double-click is performed on the macro.
In order to create a custom intermediate control panel (this procedure is described in full details in the MUSTIG tutorial) :
Close both the interior of the macro and the control panel you have just created. Double-click on the macro in the program window : your user-friendly control panel appears. If everything is alright, you may want to lock up the macro (Alt+W shortcut) to avoid spurious changes and enable easy edition of the parameters.
A double-click on this intermediate panel itself shows the interior of the macro, as usual.
The example below shows a modified version of the Ramp/t macro built in the previous section. The macro has no front panel any more, but when you double-click on it, a user-friendly second-level control panel appears.
![]()
Double-click :
Double-click :
Image windows allow to build custom user interfaces from a complete MUSTIG program. It is based on the same "Drag&Drop" principle as the images of macros, except that they may contain images of boxes from different macros of the program, plus additional text boxes.
They allow to quickly create :
How to create an image window ?
The procedure is described in full details in the MUSTIG tutorial.
A standard A4 window initially empty can be found in the library within the macro Image. A graph can contain as many Image modules as wanted. You can change their name, move or resize them just like any other box. The only rule to place image window modules in the graph is to put them at 0 hierarchy level, i.e. in the main graph, not inside a macro.
Each Image module can be opened by a double-click. An empty windows with scroll bars appears. The default size of these image windows is A4. The size of these image windows is determined by the values entered in the Page Setup window (File menu), when the macro is fetched from the library, or when the window image is selected and the page setup parameters are modified.
Basically, any element of the MUSTIG program - except the Image module itself- can be sled into the image window to create a custom interactive control panel for your application :
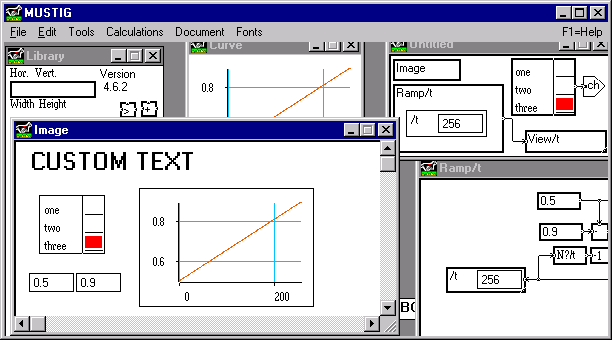
Hyperlinks are created with the program itself, so that any parameter sled into an image window can directly be altered from there. An example of such Image window is shown below : several boxes and results from the MUSTIG program have been gathered into the Image window, so that they can easily be handled from there :
Note : If the boxes you slide into a image window contains scroll bars, the size of the box in the image window will be the maximum size of the original box, as if it did not have scroll bars.
Once you have gathered all the parameters and results in one or several image windows, you can add text boxes of various character size, font and style to comment your application, label the input parameters, explain the results, etc. Arrange all the modules to taste.
When you're done, you may want to lock up the image window by clicking inside and using the Alt+W shortcut and save the result (Alt+S). This will protect your application from unwelcome modifications.
Your application can then be monitored directly from these interfaces, without having to know anything about the algorithms involved in the program :
Each time the results of a simulation seem interesting, just print the image window by clicking inside it and launching the Print command in the File menu. Make sure you have previously defined the page setup parameters.