3-13 User interfaces (mouse controlled modules)
3-13-2. General principles concerning user interface modules
The user interface tools are mouse controlled modules (check boxes, scroll bars, check lists, …) that make the use of your applications much more comfortable, quick and intuitive. They are located in the Utilities / Mouse interfaces box of the MUSTIG standard Library.
3-13-2. General principles concerning user interface modules
The mouse controlled interface tools are special macros, which have no name. The elements displayed in the front panel of the macro depends only on the elements placed inside the macro.
In any case the macro must contain an interface module named Module which can be found in the Utilities / Mouse interface / The Attributes sub-box of the Library :
![]()
Inside this elementary module, one or several of the following modules must be placed :
In addition to the Module elementary module, the interface macro may contain other specialized modules called Attributes. The attributes modify the behavior of the interface module. For example, they can be used to change the check sign, set min and max boundaries and increment value for the scalars returned by a scroll bar, etc. The attributes are in the Utilities / Mouse interface / The Attributes section Library.
3-13-3. List of the mouse interface attributes
The attributes that may be used with a given user interface module are listed in the relative section. Some attributes are used as they are, others require input or output modules to be sled into them for initialization.
We strongly recommend that you open the provided user interface modules and take a look at all the examples to get familiar with the construction and use of user interfaces.
A complete list of the available attributes is shown below :
|
Name of the attribute + example of use |
Function |
|
|
Contains the output values of the user interface module. May also contains initialization values. |
|
|
Allow to set alphanumerical labels for the different choices of a vectorial user interface module. The labels are defined by resizing the module and sliding a scalar or string input module into it. The labels of two consecutive lines are separated by a carriage return. This module may also contain a curve. |
|
|
This module allows to set the width of the labels displayed on the front panel by sliding a scalar input module into it. |
|
|
Sets the lowest value that can be returned by the user interface. Use for example a scalar input module to set the value. You may also use a scalar display module ?????? and set the value outside the interface module. If this module is not present, the default minimum value of the output is 0 |
|
|
Sets the largest value that can be returned by the user interface. If this module is not present, the default maximum value of the output is 1. |
|
|
Enables incrementing. |
|
|
Enables decrementing. |
|
|
Displays the front panel horizontally instead of vertically. |
|
|
Sets the step between two consecutive values for the increment or scroll bar modules. If this module is not present, the default increment of the output is 0.01 |
|
|
Sets the vertical space between two consecutive labels for vectorial modules. |
|
|
Sets the number of samples of the output vector for vectorial modules. If the output vector initially contained fewer elements, the last sample is repeated. |
|
|
Saves the last value when the module is initialized. The user's choices will be saved even if the module is reinitialized, until the initialization value is explicitly changed. |
|
|
Draws a cross in check boxes instead of a square. |
|
|
Draws a check mark in check boxes |
|
|
Draws the marks in blue (default is red) |
|
|
Draws the marks in yellow |
|
|
Draws the marks in green |
|
|
Normally, the front panel of a user interface module is automatically calculated as soon as it is visible. If this module is present inside the user interface macro, the calculation of the front panel must be explicitly asked for by right-clicking on the interface module. |
Several types of check boxes are available in the Utilities / mouse interface / Check boxes section of the Library. Check boxes return an integer equal to 1 if the box is checked, or equal to 0 otherwise.
Supported attributes : Cross, Check, Blue, Yellow, Green
Unchecked : ![]() Checked :
Checked : ![]()
Supported attributes : Cross, Check, Yellow, Blue, Green, Labels, Label size, Spacing, Vector length.
This module returns a vector of integers with values 0 or 1, depending on the check status of each box. The name of the output variable is defined in the Module box inside the user interface macro.

The above vectorial check boxes module contains labeling attributes. The inside of this macro is shown below :
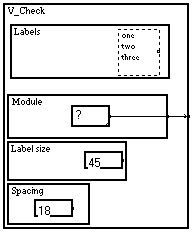
The vectorial input macro ![]() inside the Module box contains the name and length of the output variable. Its inside is simply :
inside the Module box contains the name and length of the output variable. Its inside is simply :
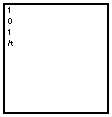
indicating that the output variable is named t. The elements of the output vector change dynamically, depending on which boxes are checked.
Supported attributes : Cross, Check, Yellow, Blue, Green, Labels, Label size, Spacing, Vector length.
"Radio" boxes are similar to vectorial check boxes, except that only one box can be checked at a time.

The above "radio boxes" user interface has no labeling module inside. Thus, only the mouse sensitive boxes are displayed on the front panel.
In many applications one needs to know the index of the checked box, that isto say, the index of the 1 value in the output vector. The Pos global max/t Library macro (available in the Variables changes / Operations on vectors section of the Library) can be put right after the mouse-sensitive radio box in order to extract this index (remenber that in MUSTIG language the indices of any vector start at 0) :
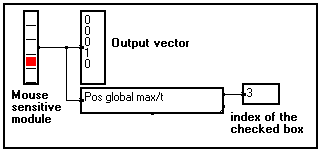
Scroll user interface module return a scalar or a vector from a graphical, mouse sensitive cursor.
Supported attributes : Horizontal, Mini (default = 0), Maxi (default = 1), Bin (default = 0.01).

By sliding the mouse sensitive cursor up and down, the user changes the output value of the interface module. The step and boundary values are set inside the user interface macro :
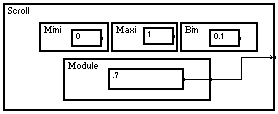
According to these attributes, the output scalar value will range between 0 (cursor down) and 1 (cursor up) and change with a step of 0.1.
Supported attributes : Mini, Maxi, Bin, Labels, Label size, Spacing
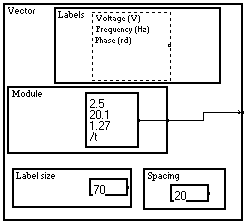
This module displays a set of mouse sensitive cursors and returns a vector. The values of the elements of the output vector depend on the position of the cursors on the front panel. Labeling attributes may be added. The name and length of the output variable is set in the Module box inside the vectorial scroll interface module, as in the vectorial check boxes module.

The above example shows the front panel of a vectorial scroll module and the output result. Labeling attributes have been added inside the macro. The output values for the three labeled parameters (namely Voltage, Frequency and Phase) can be altered by simply moving the cursors left or right with the mouse.
The attributes placed inside the user interface macro allow to control the steps and boundaries of each output parameter, as well as the displayed labels :
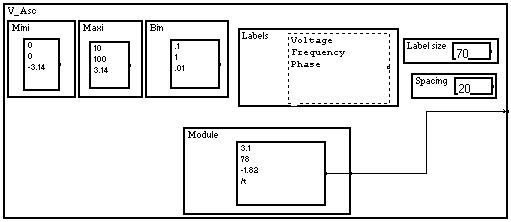
As usual, the name of the output variable (here : /t) is set inside the Module box.
3-13-5. Scalar increment module
Supported attributes : Horizontal, Up, Down, Mini, Maxi, Bin
This module allows to set the value of the returned scalar by clicking on the up and down arrows (or left-right if the Horizontal attribute is present) displayed on the front panel.

In the above case, attributes have been added to control the step and boundaries of the output value, display a horizontal front panel instead of a vertical one, and enable up and down changes of the output value. The inside of the macro is shown below :
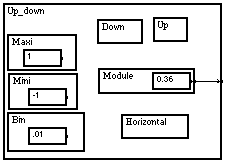
3-13-6. Choice of a scalar within the elements of a vector : the Vector->Scalar module
Supported attributes : Spacing,
The Vector->Scalar module allows to select the value of the output scalar by clicking one of the values listed on the front panel.

Once a value has been selected, the choice can be changed using the Up and Down keys on the keyboard.
If the module is not locked, you may edit and change a value in the list just by Shift+Ctrl+Clicking on it.
The interface macro contains only the Module box and a Labels labeling attribute initialized with a Val scalar input module containing a list of values according to a variable (here : /t). The inside of the interface macro is shown below, with all input and output macros decompacted :

3-13-7. Switch between several operations : the Choice module
Supported attributes : Spacing.
The Choice module is in fact a macro built from the Vector->Scalar interface module (see 3-13-6) :
This allows the user to connect the output of several algorithms to the input pins of the Choice macro, and select the algorithm to be used with a simple click. Be aware that this change is not dynamic : it cannot be modified when the program is running. The Choice module acts like a steering module prior to compiling the graph.
How does the Choice module work ?
The Choice macro is available from the MUSTIG Library, but it is interesting to see with a simple example how it has been created. First, let us fetch a Vector->Scalar module from the Library and modify it as shown below :

The Labels labeling attribute contains a text input module filled with 4 names of commonly used weighting windows, which we want to be able to choose from using the mouse. The content of the Module module has been replaced with a slave jump module.
As the Vector->Scalar module is a mouse interface module, the text labels are automatically displayed on its front panel. We resize the front panel properly so that it looks as below :

If we click one of the labels on the front panel with the mouse, for example the third label, its text is automatically copied into the jump module :

and outlined with a thin frame on the front panel :

The output pin of the module is thus a slave jump which name is "Blackmann". Thus, if we embed this Vector->Scalar module in a macro named for example Weighting window, which contains a master jump with the same name, an invisible connection will be made between the master and slave module.
The inside of this new macro could look as below (see Creating a macro) :
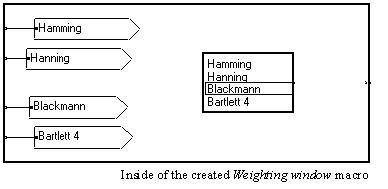
Four master jump modules have been sled into the macro and named with exactly the same labels as in the Vector->Scalar module. Be careful not to enter an additional <space> sign by accident !
Caution :
The name of these labels is case-sensitive. It may contain any ASCII character and may be as long as you want. However, it must not contain any carriage return : this feature is reserved for switch jump modules (see switch jump modules).When an option is selected with the mouse on the front panel of the Vector->Scalar macro, an invisible link is created between the master and slave jump modules. That is, the output pin of the macro is connected to one of its input pins, depending on which option is selected.
So, we are almost done. All we have to do now is resize the front panel of the Weighting window macro we have just created and slide the front panel of the Vector->Scalar module into it to create a hyperlink (see Images of macros). Connect the different weighting windows algorithms accordingly.
We obtain a program similar to the one shown below :

By clicking on an option, we directly connect the output to one of the weighting windows !
The Choice module provided in the MUSTIG Library is identical to the one created in the above paragraph, except that it has only three possible choices labeled Calc. 1, Calc. 2 and Calc. 3 by default :

You may of course change the labels, or add or remove options as follows :
Supported attributes : Labels, Label size, Spacing.
The Vector user interface module allows to define a vector of values. The elements of the vector can be changed by editing them (Shift+Ctrl+Click). When an element is being edited, the Up and Down keys allow to edit the previous or following element of the vector. The example below contains labeling attributes to provide the user of the application with more explicit information :

The inside of the macro is shown below :
3-13-9. How to initialize the output value of a mouse interface macro ?
Suppose we want the result of a calculation to be used as the default output value of a mouse interface module. The MUSTIG language offers the possibility to communicate a default value to the interface module. In order to do this, we just have to include a scalar display box ?????? into the Module box inside the interface macro, as shown below :

Now, we create an input pin by Shift+Clicking on the left border of the module, and link this input pin to the scalar display module :

The last step is to connect this input pin to a scalar value. Here the scalar value is provided by a simple scalar input module with value 10, but of course it could as well be provided by more complex calculations :

The value on the input pin we have created is used as the initial value of the output. By clicking on the arrows of the interface macro we can increase or decrease the output from its initial value 10.
3-13-10. How to keep the selected value when the program is reinitialized ?
The program in the previous section (see How to initialize the output value of a mouse interface macro) allows to initialize an increment operator with the scalar result of a calculation. The user has the opportunity to change the output value of the mouse interface module by clicking on the arrows.
But if we reinitialize the macro or close / open the program, the initial output value of the mouse interface macro will again be 10 !
It order to save the last output value and use it as the initial value when the interface module is reinitialized, we just have to slide a Save attribute into the inside of the mouse interface macro, and then slide a string input module into this Save attribute. Thus, the inside of the increment macro becomes :

When the output value is changed by a mouse click, the string input module inside the Save attribute saves the initialization value entered on the input pin. When the program is reinitialized, MUSTIG compares the initialization value with the saved one.
If they are equal, it means that the initialization value on the input pin has not been changed. In this case, the output value is not set to the initialization value : it keeps the last value it had when the program was reinitialized or closed.
On the other hand, if the initialization value is not equal to the saved one, it means that the user has changed the initialization value. In this case, the output value of the interface macro is set to this new initialization value.
3-13-11. Composite mouse interfaces
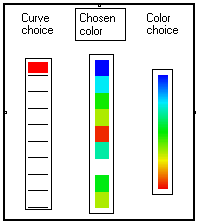
Many examples of composite mouse interface macros are shown in the Interface.MTG file provided with this software : direct selection of a scalar from a range of colors, looped interfaces, etc. Examples are shown below :
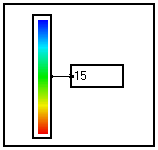
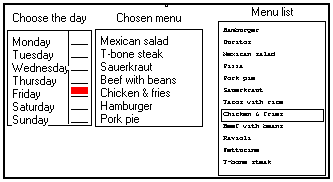
An example of complex composite interface, featuring a feedback loop
The structure presented in this section is a bit complex, though powerful. You should study it only if you are already familiar with MUSTIG, particularly with the basic mouse interface operators. See the appropriate sections in this manual to get used to programming of mouse interfaces in MUSTIG language.
This application allows to choose, from a list of menus, a particular menu for each day of the week. It uses a looped mouse interface operator. We start with the following program (available in the interface.mtg example file) :
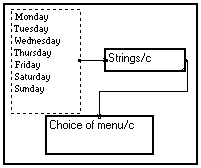
where Choice of menu/c is a MUSTIG macro. It has an intermediate control panel from which the user can choose the menus :
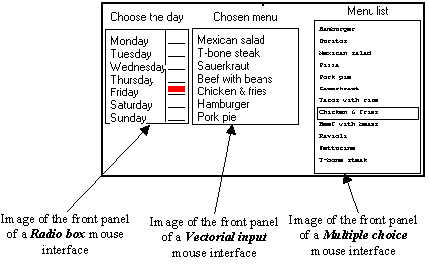
In this intermediate control panel, the mouse-sensitive macros have been put into images in order to be directly accessed to.
The list of the menus that have been selected for the current week is displayed next to the clickable list of the days. The user just clicks on the day he wants to handle, and chooses a menu from the global list on the right : his choice is framed in the menu list and the central list is updated.
Conversely, the user may directly edit an item in the central list and enter the name of a menu : his choice is then framed in the menu list. If the entered menu is not an element from the global menu list, the choice in invalidated when the user clicks on another day.
This double possibility of choosing the menus is obtained with the following program (content of the Choice of menu/c macro) :
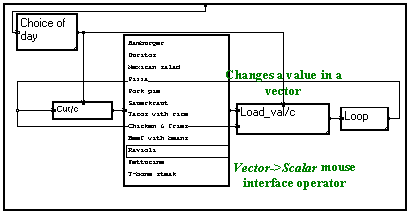
The Choice of day macro contains a mouse interface operator (a Radio box). This operator returns a vector according to variable /c. All its values are zero except the one located at the selected index which is 1.
|
Content of the Choice of day macro |
Content of the Pos/c macro |
|
|
|
The Pos/c macro then returns the index of the currently selected day (from 0 to 6). This allows to cut the vector containing the current choices according to the chosen day.
The last mouse interface operator that we have seen on the front panel indicates which menus have been chosen. This operator is a Vector mouse interface operator whose Module box contains an initialization box. It is inside the Loop macro and returns a string containing the chosen menus :
|
Content of the Loop macro, showing the front panel of the Vector operator |
Content of the Vector operator |
|
|
|
The Strings/c Library module changes the input string provided by the mouse interface operator into a vector of strings according to variable /c. Each element of this vector is a line of the input string.
How does this graph work ?
The current day is chosen with the mouse. inside the Choice of day macro, which returns the number (index) of the day.
The vector of strings containing the currently selected menus is cut at this index.
This cut string is used as the initialization value of the V_Scalar interface operator containing the list of available menus. The content of this module is shown below :
|
Front panel of the V_Scalar mouse interface operator |
Content of the V_Scalar operator |
|
|
|
The user may click on the mouse-sensitive front panel to select another menu (that is, another string), different from the initialization string. This selection is sent to the output.
The Load_val/c Library macro (which allows to change an element of a ¾ either numerical or alphanumerical ¾ vector at a given index) then changes the menu-of-the-day vector of strings by replacing the previous menu by this new user's choice.
The Loop macro contains a Vector mouse interface operator with an initialization string display. The output string may be modified by the user from the mouse-sensitive front panel.
This string containing the menus of the week is cut into a vector of strings and sent back to the beginning of the loop. It is ready to be cut and changed again if the user selects another day.
However, this program does not work properly although the structure seems logical and correct. Here's why.
There is a bug !!!
The proposed graph does not work properly. If we close all the macros but the control panel and start from the following state (Thursday's menu is Pizza) :
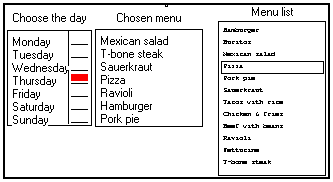
and click on Monday to select a new menu for this day, we obtain the following panel :
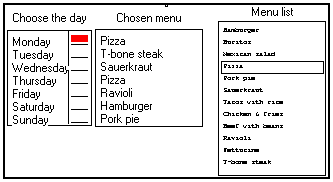
We expected the old Monday menu (Mexican salad) to remain in the list until we choose a different selection from the list of available menus. But this old value has been replaced by Thursday's new menu (Pizza), corresponding to the previous change ! We do not know any more which was the old selection for Monday !
Influence of the order in which the boxes are executed
By clicking on Monday, the user modifies the index at which the string vector containing the daily menus must be cut. This change in the index modifies two general purpose alphanumerical display modules used for initializing the content of two mouse operators with strings :
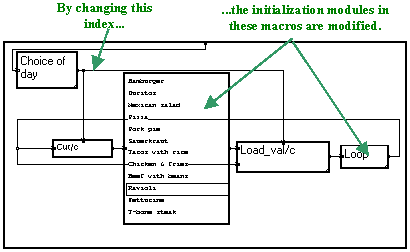
But the order in which these operations are calculated is not fixed. It may even be different if some macros are open and some initialization modules are visible. It may even be different from one run to another, depending on what has been changed.
In our case, the change in index (day 3 becomes day 0) is transmitted to the Load_val/c module first. Thus, the first element of the vector of strings (the menus of the week) ¾ that is, Monday's menu, is changed to the value presented at the output of the menu list before the change in index has been performed. Thus, Monday's menu automatically changes to Thursday's instead of keeping its present value !
Remedy
What we want is this Load_val/c module to be calculated after the change in index has been transmitted to the Cut/c module to modify the initialization value for Monday's menu. If these operations are correctly performed, the panel should look like below we the user clicks on Monday.
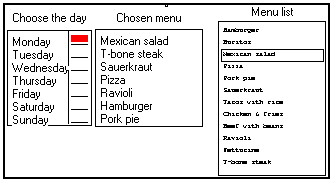
Monday's selection still has its previous value (Mexican salad) in both Chosen menu and Menu list fields, until the user selects another menu for this day.
This is done by embedding the Vector mouse interface operator located inside the Loop macro into a Save mouse interface attribute. The content of the new Loop macro thus becomes :
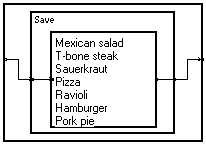
The Save attribute indicates that the contained macros should be recalculated last when a modification of the graph is performed. The behavior of this modified program meets our requirements.
Another example : choosing several composite lines
The same technique allows to choose the color of a set of curves from a color palette. It is used in all the 2D view Library macros (View_2D_n, View_2D_N). Check out the Multiple color choice box in the Interface.mtg example file.
