

3-2-1. Creating boxes and fences
3-2-1. Creating boxes and fences
A fence is a frame drawn around text, modules, and/or macros.
Creating simple boxes or fences to frame several elements
A fence (also called a box) is created by sliding the mouse cursor from a corner of the box to the opposite corner. While sliding, a rectangle with dots is shown and when the mouse button is released, the box appears. All boxes included within the rectangle become sub-boxes of the new box thus created. If the fence crosses some wires, pins are automatically created :


Text boxes contain text (comments, parameter labels). They only become visible when they have been selected (gray rectangle), or is they are too small to contain the whole text. Otherwise only the text is visible.
To create a text box, hit Alt+T and click where the text should be entered. Enter the text. Click outside the text box to exit the Edit mode.


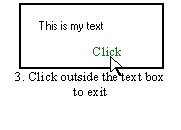
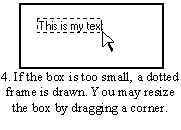
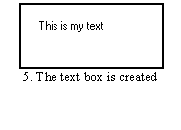
Creating looped boxes or bundles
If a group of operator included in a box must be repeated several times (like in a procedural language loop), a looped box must be used. To create a looped box with two pins facing each other (see figures below),
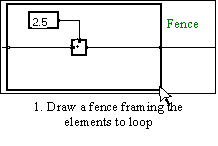
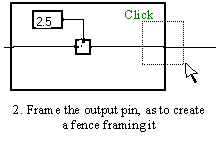
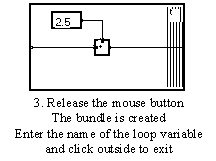
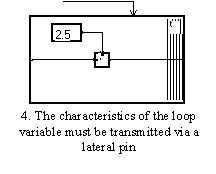
The name of the loop variable shown with the folding lines ("t" here) can be modified later on like any text.
If the input pin of the box is not facing the output pin, the looped box will not be obtained. Instead, a small box near the output pin will be created. This box must be destroyed. The pins must be moved to face each other before attempting to create the bundle.
You may create a bundle from a box having more than one couple of facing pins, but any output pin must face the associated input pin.
To suppress the looping of a box, the same operation that was done to create the loop must be performed : draw a fence framing the looped pin(s).
The boxes to be reduced into a macro must first be framed with a fence. The macro box is then created using the Create a macro command selected from the Tools menu, or using the Alt+M shortcut.
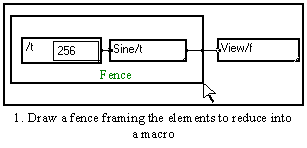
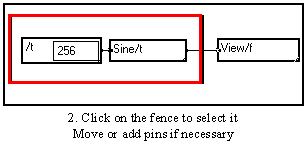
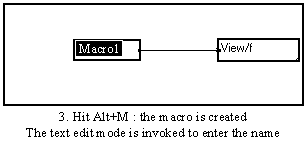
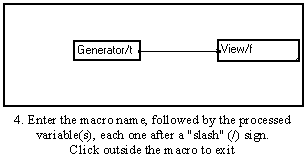
You may of course open the created macro by double-clicking on it, add or remove pins, change its content, or create a front or intermediate control panel.
3-2-2. Selecting, deselecting boxes and fences
To select or deselect a box, move cursor inside box and click. If the box is selected, the box perimeter is thickened by a red frame.
If the box is locked (see (Un)Locking a box), avoid clicking near the variable names, for this would automatically put you into the edition mode (this is done to allow quick change of the variables). Rather click on the name of the mode or on its border.
3-2-3. Moving boxes and fences
To move a module or a macro, it is not necessary to select the box before it is moved. If the box is locked (see 3.7), avoid clicking near the variable names, for this would automatically put you into the edition mode (this is done to allow quick change of the variables). Rather click on the name of the mode or on its border.
An exception : a simple, unlocked fence framing boxes must be selected by clicking on it prior to being moved. Otherwise a new box is created. When a fence containing boxes is moved, its whole content is moved, not just the fence itself.
There are four possible ways of moving boxes :
"Fast" moving and keeping links.
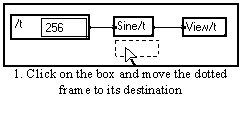
It is the most common way of moving a box. Just click on the box with the left button of your mouse, move the box and release the mouse button to drop it.. The frame of the box you are moving is shown with a dotted line : release the mouse button when the dotted frame is in a satisfactory place.
Link management
If the box is linked, the links disappear while it is being moved. They are redrawn when the mouse button is released. They are calculated against another path. In a few cases, points on these new links may be in a wrong place (within other boxes) : links should then be rearranged (see Moving links).
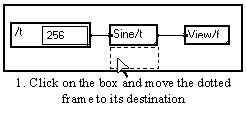
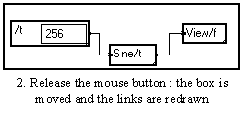
Overlapping
If the grayish rectangle overlaps other components when the mouse button is released, all components are rearranged and no overlapping occurs.
Text boxes can be moved in the same way but they can overlap each other. However a text box cannot overlap boxes of other types.
Automated functions
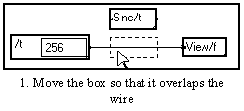
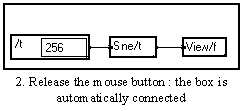
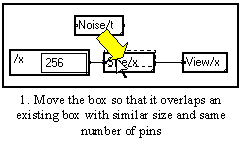
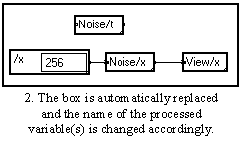
Fast moving without keeping links
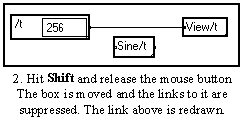
You enter this mode by pressing the Shift key before releasing the mouse button. Otherwise, proceed like in the above mode. Links are then suppressed. However, if the box moved in this mode contained an input pin and an output pin facing each other and if these pins were linked, the link is reconnected above the moved box.
If the box is moved to another window the box is duplicated in the other window. It is this way that elements placed in the library or in other files are transported (you may also use the cut and paste facility).
To select the slow moving command, press the Ctrl key (or the Option key for Mac users). The "hand" cursor appears. Move the cursor to slide the box that you want to move, the links remain visible and are continuously deformed. Linked boxes are moved and push the other boxes on their way.
Text type boxes, on the contrary, can overlap while moving in this mode.
This mode allows to perfectly align boxes. Click on the box with the left button of the mouse to select it. A thick red frame is drawn around the box. Then, use the arrow keys of the keyboard to slowly move the box, pixel by pixel.
3-2-4. Resizing boxes and fences
A box (which may be also a window) can change shape if the cursor becomes a ![]() when moving one of its four corners with the mouse.
when moving one of its four corners with the mouse.
There are three modes for resizing a box :
Fast resizing and keeping links
It is the most common way of changing shape. Click one corner of the box with the left button of the mouse and slide the cursor to resize the box. Release the mouse button when the size is correct. The boxes surrounding the box to resize are moved if necessary, so that no overlap occurs. The links are redrawn, calculated against another path. Some points of these links might be at the wrong place (that is within other boxes); in this case links can be rearranged manually (see Moving links).
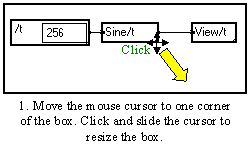
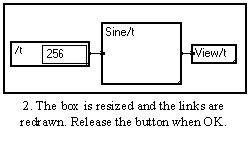
Resizing fences
After rearranging so that the rectangle of the deformed fence does not overlap other components, the new box owns all elements that it encloses. If links are cut, pins are created at the places of the cuts. On the contrary, continuity is established for the links which were initially cut and are no longer cut.
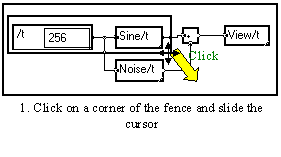
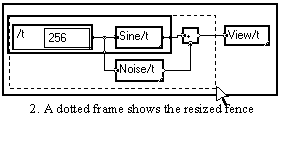
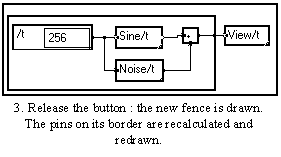
If the final fence becomes too small, it disappears. This is the way to suppress a simple box which contains components without suppressing those elements.
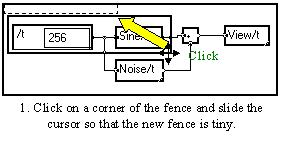
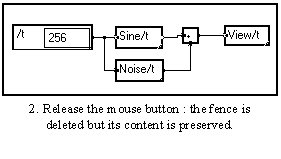
What happens to the images of resized macros ?
If the resized box has images or is an image (see Images), and if there is not enough room somewhere in the master window or in an image to resize the box, the operation is cancelled. The box in which resizing is not possible is shown with a thick red frame.
What about locked macros ?
If a locked macro is resized, the images it contains move proportionally so that the general aspect is maintained. This behavior may be obtained with unlocked boxes if the Shift key is pressed while resizing the box.
This mode is selected by pressing the Ctrl key (Option key for Mac users) before clicking on a corner of the box to resize.
In that case the links remain visible and are continuously deformed. Linked boxes are moved, towards the inside in the case of shrinking, towards the outside in the case of widening, pushing the other boxes in their way.
If the Shift key is pressed while resizing a box, the elements is contains are pushed apart, keeping the same relative position within the box.
Suppressing a box can be performed by first selecting it (clicking within) and then pressing the delete key (![]() ). Be careful, however, as all sub-boxes and macros inside the box will be suppressed as well. To delete a fence without deleting all the elements it contains, see Fast resizing and keeping links. Any box (simple, text type or macro) can be suppressed this way except the window itself.
). Be careful, however, as all sub-boxes and macros inside the box will be suppressed as well. To delete a fence without deleting all the elements it contains, see Fast resizing and keeping links. Any box (simple, text type or macro) can be suppressed this way except the window itself.
Some MUSTIG boxes are implicitly matched due to symmetry or direct dependence :
Just Shift+Click on such a box : the matched box appears selected in red.
If the matched box is located inside a macro, the macro is selected in red. Hit Alt+I (or double-click on the successive selected modules) until the matched module appears.