3-9-1. Propagation of jump modules inside macros
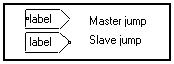
The jumps are special modules, allowing to make invisible links between operators in order to make the graph clearer. There are two types of jump modules : the master jumps and the slave jumps.
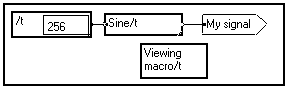
For instance :

is equivalent to :
![]()
3-9-1. Propagation of jump modules inside macros
Jumps are able to propagate inside the macros. For example :
is completely equivalent to :

A master jump module can be linked to several slave jump modules, under the condition that the slaves have the same name as the master and be at the same level as it, or inside an inner box.
Note that the name of the jump modules can include several words, not just a one-word label. They can thus be very explicit.
Caution : the name of the jump modules is case sensitive !
3-9-2. Finding a slave or master jump module
To find the master jump associated with a slave jump, or to find the slave jumps associated with a master jump, just Shift-Click on the jump module : the associated jump module appears, selected in red. If the slave jump module is located inside a macro, the macro is selected : double-click as many times as necessary on the selected modules until the jump module appears.
The switch jump module is a very special module which is not linked to any other box, but alters the name of one or several inner jump modules.
It is an unconnected classical master jump module, which name is entered as two lines separated by a carriage return : the module name and the slave name. The switch jump module should not be linked to any box.
![]()
The "Module name" simply allows to distinguish between one master switch jump module and another.
The "Slave name" is the name to be given to inner jump modules. Every instance of the switch jump module will be implicitly linked to the slave jump module which name is "Slave name". The examples below should make it clear.
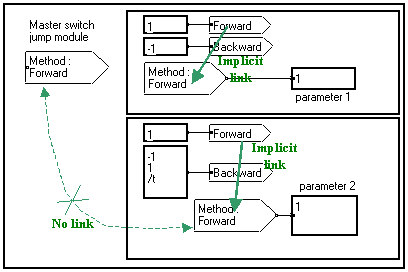
Example 1 : Switching between several slave jump modules
In this case the switch jump module refers to a slave 2-line "regular" jump modules.
Let us suppose that the algorithm we have just programmed has two ways of running : backward and forward (think of the estimation of a covariance matrix for instance). The switch jump modules allow to switch between the forward and backward behaviors at several steps of the algorithm :

If the name "Forward" is entered on the second line of the switch jump module, then all the 2-line jump modules inside the window or at lower levels are implicitly connected to the "Forward" slave jump modules, like in the figure above.
Note : There is no link between the switch jump modules and the other jump modules, but there is a link between the two-line slave jump modules and the classical master jump modules :
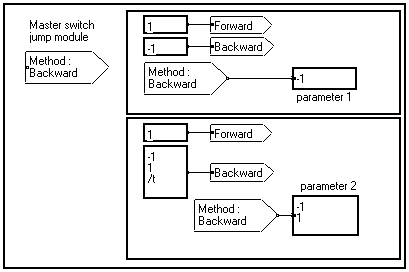
Now if we enter the word "Backward" instead of "Forward" on the second line of the switch jump module, the word "Backward" is automatically written on the second line of the 2-line slave jump module. Thus, implicit connections are made with the "Backward" slave jump modules and the parameters change their value :
This powerful capability acts like "global switch flag" in a classical language. It allows to select at several steps of the algorithm the calculation to be made, just by changing the name on the second line of the master switch jump module.
Note that all the possible calculations do not need to have the same number of dimensions. In the above case, parameter 2 is equal to a scalar for the Forward algorithm, but becomes equal to a vector of two elements according to the variable t in the Backward case.
Example 2 : Switching between several master jump modules
In this case the switch jump module refers to a master 2-line "regular" jump module.
In the example below, the user can switch between two modes for drawing a curve : drawing it as a regular real signal, or drawing it as a complex signal with null imaginary part. The choice is made with a switch jump module, but the drawing is always made in the same graphical window. A 2-line master jump module transmits the graphical window to one drawing macro or the other :
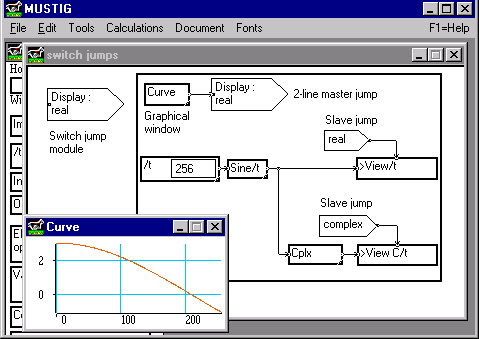
In the above case, the word "real" is entered in the second line of the switch jump module. This word is thus copied into the 2-line master jump module. As a consequence, a link is implicitly created between this 2-line jump module (that is, the graphical window) and the "Real" single slave jump module (that is, the macro expecting a real signal). Indeed, the Curve window shows a real signal.
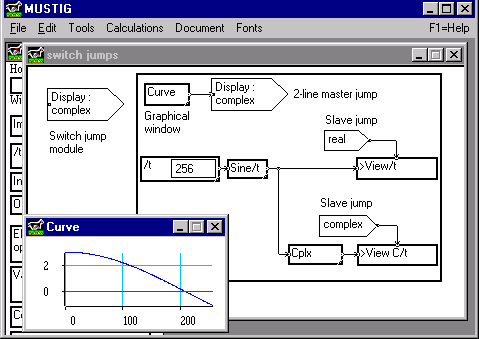
Now, if we enter the word "complex" in the switch jump module, it is copied into the 2-line master jump module. Thus, the implicit link is now between the graphical window and the drawing macro expecting a complex signal. The Curve window thus shows a complex signal with null imaginary part :
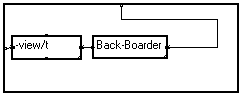
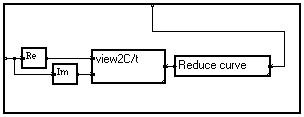
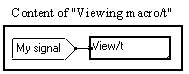
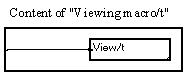
Note : The >View/t and >View c/t macros in the graph above are macros from the Outputs section of the Mustig standard Library, that have been unlocked and slightly modified, so that the graphical window in which they operate is transmitted on the top pin, instead of being initialized inside the macros :
|
|
|
|
>View/t macro |
>View C/t macro |
Tip : How to use the mouse to select the slave module ?
We refer to the above example 1 for convenience. Please see Mouse interface if you are not familiar with building mouse interfaces with MUSTIG.
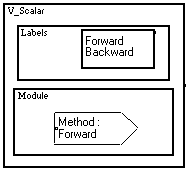
Instead of having to explicitly write the name of the method (Forward or Backward) each time we want to change it, we would like to be able to change it just by clicking on a choice box with the mouse. In order to do this, we just have to wrap the master switch jump module into a "Vector -> Scalar" mouse interface module. The latter is found in the standard MUSTIG Library in the box Utilities / Mouse interfaces / Vector->Scalar.
We fetch the module from the Library and modify its content as shown below :
Now we just have to replace the master switch jump module in our example by this mouse-sensitive module :
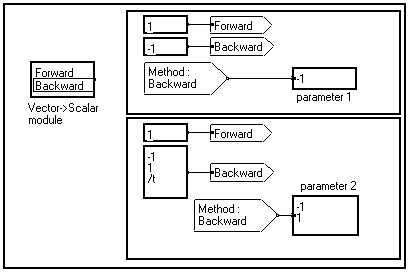
Each time the user clicks on "Forward" or "Backward" on the Vector->Scalar module, the choice is framed by a thin black line. The name of the slave switch jump modules are modified accordingly and the parameters of the algorithm are set to their correct value.
We might also create a macro from the above program (see create a macro), and an associated control panel (see how to create a control panel) in which we fetch, for example, the mouse sensitive module for choosing the method, and the value of parameters 1 and 2. The result could look like this :
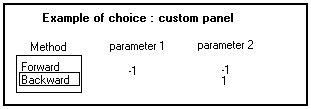
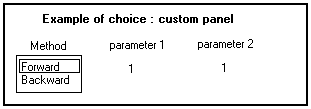
The choice of the method can be made directly from the control panel using the mouse, the value of the parameters are automatically changed and displayed.