THE MUSTIG MENUS
Table of Contents
The MUSTIG TOP BAR MENUS
In the sections below, the Alt key and the Ctrl key do the same job.
Opens a new Untitled MUSTIG program window.
Opens a MUSTIG program. Allows to browse through the directories to find the program. If the program requires additional MUSTIG libraries (either official libraries or custom libraries saved with the Save special command), these are automatically opened, provided that their paths have been entered in the left column of the Edit / Options / Paths window.
All the windows that were open when the program was saved are opened again.
If the file is a library (saved using the Save special command), it is opened as such and thus cannot be modified. Use Open special to open a library as an editable program. The maximum number of opened libraries is 32.
Closes the selected window.
Saves a MUSTIG program on the disk. A dialog box is invoked when this command is launched for the first time. A backup file (tempfile on Macintosh or .bak on PC and UNIX) containing the previous version is created.
If the program is a library which had been opened using the Open special command, the library type is preserved and the graph is saved as a library.
Allows to save a graph under another name.
Closes the MUSTIG graph and reopens the last saved version. This cancels all the modifications that were carried out since the program was saved. You need to select the main program window before calling this command.
Opens a MUSTIG library (either an official library or a custom library saved with the Save special command) as an editable graph. When this graph is saved again (Alt+S), it is saved as a library.
Saves a MUSTIG program as a library to create a custom additional MUSTIG library. Only the macros which have previously been documented can be considered as library modules and referenced as such. These library modules are saved only as references when they are used in a MUSTIG program. Undocumented modules will be fully copied when used in future MUSTIG programs.
Displays the online help associated with the selected module.
Sets some print options : size and orientation of paper, reduction ratio. Other print options can be set from the Edit / Options / Graphics window : High-resolution mode, EPS file, etc.
Any MUSTIG window may directly be printed. In addition, image windows (see Image windows) automatically adapt the size of the printed result using the Page setup options (proportional factor and landscape / portrait format) in the File menu.
When an Image module is slid from the Library into the program window, the size of the associated window is automatically set, taking into account the Page setup parameters. Furthermore, if you select an Image window and modify the Page setup parameters, the size of the window is changed accordingly.
Reduce / enlarge parameter
This value defines the proportional factor between what you see on your srceen and what you get on your printer. The default value is 100 : what you see is what you get. A larger value, 200 for example, indicates that all the boxes will be enlarged twice when printed. As the result is a A4 sheet, the size of the image window on the screen is reduced accordingly.
UNIX users
In addition to the output format and the size modification factor (see Print options), the File / Page setup menu allows to choose between two types of output :
If you choose to send the results to a printer, the command line to use must be entered in the appropriate box. By convention the "$" sign states for the current file name. For example : laserprint -d MyPrinter -PrinterOptions -f $
If you prefer to generate a PostScript file instead, you may specify a file name. If no file name is entered, the produced PostScript file has the same name as your program, plus a .PS extension.
If the "MyProgram.ps" file already exists, the new PostScript file is named "MyProgram_a.ps", and so on. However, if the Do not overwrite option is not checked in the Page setup menu, the file is overwritten.
Prints a window according to the current print options and page setup parameters. The results included in this window are calculated before sending the data to the printer.
We recommend that the results be gathered into an Image window before being printed. The print format may not be well controlled if the results are printed directly from the main MUSTIG program window.
Exits MUSTIG, saving to the mustig.prf file the options that have been modified since MUSTIG was opened (graphic options, amount of data and code memory, etc).
Directly opens a recently saved MUSTIG program, provided you have proper access rights.
Cancels the last operation(s). The number of successive operations that can be cancelled is entered in the Edit / Options / Cancel field. Default value is 1.
Cuts the selected text and copies it into the clipboard. The text can be recovered later on using the Paste (Alt+V) command.
If this command is used on a module or a macro, the result is the same as with the Copy (Alt+C) command.
Copies the selected text or module or macro or image into the clipboard. The content of the clipboard can be recovered, either in a MUSTIG program or in another software, using the classical Alt+V or Ctrl+V command.
If you want to duplicate a macro in a MUSTIG program, use the Alt+D command instead.
If you want to copy a macro from a MUSTIG program into another MUSTIG program, just slide the macro into the destination program.
Copies the content of the clipboard at the current position of the cursor. This content may be a text, a list of numbers, a macro, or a picture created using another application. A picture pasted into a MUSTIG graph is handled like a simple text box. It may be included pasted into the front or intermediate panel of a macro (e.g. to create custom buttons), or into an Image window (e.g. to add a drawing or an equation to the interactive panel).
Duplicates the selected macro. A dotted frame is shown to allow you dropping the duplicated macro at the proper location.
Opens a series of dialog boxes that allow to change several MUSTIG options. The file containing the MUSTIG options is saved only when you exit MUSTIG, unless you click on the Write options file button.
Options from the main dialog window
Test identical macros (default = ON)
When you save your program, MUSTIG compares all the macros of the graph and saves identical macros only once. This allows to save space on the disk.
Save the whole graph (default = OFF)
When you save your program, MUSTIG normally saves the macros from the libraries as "references" only. If this option is checked, the whole content of every macro (including library macros) is saved.
This is particularly useful if you use custom or non-standard libraries and you want to share MUSTIG programs with other users, or use these programs on other machines.
Do not calculate the whole main graph (default = OFF)
If you accidentally right-click on the main MUSTIG program window, all the graphical windows and all the macros containing displays open and are calculated. This can be awkward and may also generate memory full errors.
If this option is checked, the calculation of the main program window is disabled : modules or macros or boxes can only be calculated individually.
Grid spacing in image window (default = 0 pixel : no grid)
Allows to define an invisible grid in the Image windows. The elements sled by the user into these windows can be aligned according to the grid.
Cancel (default = 1 operation)
Sets the number of successive operations which can be cancelled using the Alt+Z command.
Read options file
Reloads the previous MUSTIG options.
Write options file
Saves the current MUSTIG options.
CALCULATIONS submenuSize of Data (Kbytes) (default = 0 Kbytes)
Sets the amount of memory used for handling data during the simulations. The value must be entered in Kilobytes (e.g. 20000 = 20 Megabytes RAM). The default value is zero, meaning that MUSTIG tries to use as much memory as possible.
However, we recommend that you enter a larger value (e.g. 20000) if you are likely to handle large amounts of data.
Time threshold for automatic recalculation (default = 100)
When a value or a portion of the graph is modified, all the results that depend on it are either reset or updated. It may sometimes be awkward to update the results systematically, especially if the simulation takes a long time. This option allows you to set a threshold to control when MUSTIG should update the results, and when it should merely reset (i.e. clear) them.
If a small value is entered (e.g. 0 or 1), only the results requiring a short calculation time will be updated. Results requiring a longer calculation time will only be reset.
If a large value is entered (e.g. 256), nearly all the results will actually be updated even if this takes a long time.
If you want all the results to be systematically updated, check the Automatic recalculation option in the Calculations menu.
Vectorization (default = 1)
Switches between three compilation modes :
|
0 |
No vectorization. |
|
1 |
Minimizes the data memory used during the simulations |
|
2 |
Increases the simulation speed. This often requires more data memory. |
Size of program code (Kbytes) (default = 15 Kbytes)
Sets the amount of memory used for producing the code.
GRAPHICS submenu
Black&White palette
If this option is checked, the default color scale is changed into a gray scale : all the results on the screen are in black and white, and so are the printed windows. It may be necessary to reset the main window (see Clearing a box) before checking this option.
Color -> Thickness in drawing lines
If you do not have a color printer, you may want to check this option : the colored lines in the curves will be drawn with a different thickness. The blue curves are drawn with a thin line, the red curves with the thickest line. However, this option is not used very often, as several line styles are proposed in most viewing macros.
Color -> Thickness in drawing lines (during high-resolution printing)
The colored lines are replaced by lines of varied thickness (blue = thin, red = thick) during high-resolution printing, though they may still be in colors on the screen.
High-resolution printing
If this option is checked, the calculations are made again at print time to take the resolution of your printer into account. The result is often nicer but the process is much longer. If this option is unchecked (default), the printed result is a bitmap copy that generally does not adapt to the resolution of the printer. The print process is much faster and in some cases it is the only solution.
Black&White palette (during high-resolution printing)
If this option is checked the results will be printed in black and white, though they may still be in color on the screen.
Do not print the banner
Allows not to print a banner with the name of the program, the name of the window, the date and time, and the name of the user on the top of the printed sheet.
Print in a ".eps" file
If this option is checked, the results are not sent to the printer when a print command is invoked. Instead, an Encapsulated PostScript File is generated : it has the same name as your MUSTIG program and a .EPS extension.
Copy into clipboard
Any window (either a front panel, an image window, a curve or a graph) can be copied into the clipboard in order to be exported to other programs such as Word, Paint, etc. Just select the box or window you want to export and hit Ctrl+C to copy its content into the clipboard. Then, move to another program and hit Ctrl+V to copy the content of the clipboard into your program.
Copy into clipboard : Bitmap copy
The content of the window is copied into the clipboard as a bitmap file instead of a Windows meta-file. This often proves more reliable to export curves and panels to other applications, but it produces rougher results.
Copy into clipboard : Copy the border of the selected box
If this option is checked, the border of the selected box is copied into the clipboard. Otherwise, only the inside of the box is copied.
PATHS submenuLeft column
Define which libraries (either official MUSTIG libraries or custom libraries) should systematically be opened when MUSTIG is launched.
The gray buttons on the right of this column allow to browse the directories to locate those which contain the wanted libraries. Click on the library .MTG file to add it to the list.
Right column
Defines in which directories MUSTIG should look for the additional libraries, external routines or data files which may be used in your programs.
The gray buttons on the left of this column allow to browse the directories to locate those which contain the wanted files. Click on any file to add the corresponding directory to the list.
Use the search path for the data files
If this option is checked and your program requires a data file, MUSTIG will look for it in all the directories listed in the right column.
Otherwise, the data file is supposed to be in the same directory than your program, or in the directory containing the mustig.exe program. In it is not the case, MUSTIG opens a dialog box that allows you to select the data file in the directories.
Keep the short name for the data files after the search
When a data file is not found by MUSTIG, a dialog box opens to allow you to browse the directories and choose the right data file. The name of this file is then copied into the Read File MUSTIG module for convenience.
If this option is checked, only the short name of the file (i.e. without the directories) is copied. The appropriate path should thus be present in the right column.
Otherwise, the absolute full name, including the disk label and all the directories is copied into the Read file module. This may be awkward if the absolute name is long : you will not be able to see the name entirely unless you enlarge the Read file box.
WINDOWS submenuThese values define the size and the position of the windows which are created when using the File / New command.
Locks an unlocked macro and all the sub-macros it contains. When a macro is locked, the user may only change the values in the input modules (Value module, text input module, etc), open the sub-macros and calculate. All the other actions are invalid.
The same commands unlocks a previously locked macro. The sub-macros it contains remain locked.
Creates a macro (i.e. a single box) from several modules or sub-macros framed by a box :
You may then open the macro by double-clicking on it, move the pins, add pins, change the content of the macro, lock it, etc.
The same command is used to create an intermediate control panel for a macro.
All the MUSTIG Library macros have been built this way.
Opens the selected macro to show its content. The double-click shortcut may be used instead.
Replaces a macro by its actual content (shown by double-clicking on the macro). Make sure there is enough free space around the macro before launching this command.
Allows you to protect a macro with a password. The user will be asked to enter the password each time he double-clicks on the macro to open it. If a wrong password is entered, the macro does not open. This mechanism allows you to create custom libraries that cannot by opened or modified by the users.
To remove the password, open the macro with the correct password, then click on the macro, select Protect with password again, and enter a carriage return as a password.
This function detects, within the MUSTIG graph, modules with characteristics similar to those of a module selected before launching the List... command. A dialog box allows to select the comparison criterion.
When you press the OK button, the modules in the main program window that fit the criterion are shown with a thick red frame. The macros which contain such modules are shown with a thick blue frame.
This command may be used together with the Replace identical macros command to perform automatic updates of similar macros.
The selection criteria are :
Clear the list
Clears the previous search : the selected modules (shown with a thicker color frame) are deselected.
Same name
Searches all the macros having the SAME name as the selected macro.
Contains the name
Searches all the macros CONTAINING the name of the selected macro.
Identical macros
Searches and displays all the macros having the same name AND content as the selected macro. Allows to perform automatic updates of similar macros using the Replace identical macros command.
Macros with same name but different
Searches and displays the first macro having the same name as the selected macro but a different content.
Macros with info
Searches and displays all the macros having an online help window (created by Alt+U and viewed by Alt+H)
Macros without info
Searches all the macros that do NOT have an online help window. This is particularly useful when creating a custom user library : undocumented macros could not be considered as library elements. This command allows you to make sure all the macros of your library are documented.
Anywhere
Searches in all the graphs
In the current graph
Searches in the current graph.
In the current macro
Searches only in the current macro.
Allows to carry forward modifications made in a macro to all the similar macros of the program, in order to update similar macros at one go :
Activates the Edit mode. The mouse cursor changes into a text cursor. Click anywhere in the graph to enter a new text bow. Click outside the text box to validate.
You may also use this command to change an input value or a name in an unlocked module, or to change an existing text, but the Shift+Ctrl+Click shortcut is preferred.
Labels a pin. Two methods can be used :
First method
Second method
This feature allows to lighten the graph by reversing any macro or module horizontally.
Most of the library modules and macros have been created with input pins on the left and output pins or the right. You may unlock the box and move the pins manually one-by-one (Click then Shift+Move).
However, if you only need the left and right pins to be reversed, select the macro and launch this command : the module is reversed.
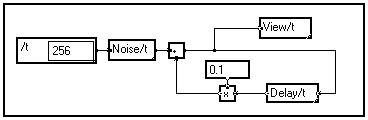
In the first-order filter below, both the Delay/t macro and the multiplier have been horizontally reversed to enhance the recursive "feed-back" aspect of the algorithm.
This feature allows to lighten the graph by reversing any macro or module vertically.
Most of the library modules and macros have been created with input pins on the top and output pins or the bottom. You may unlock the box and move the pins manually one-by-one (Click then Shift+Move).
However, if you only need the top and bottom pins to be reversed, select the box and launch this command : the module is reversed.
Allows to create an online help window for the selected macro. This window will open when clicking on the macro and hitting Alt+H. See Creating an online help window for details.
Deletes the online help window associated with a macro and viewed with Alt+H.
Suppresses / restores scroll bars to the selected window.
Calculates the selected box. The right-click shortcut is generally used instead.
Clears all the modules and macros in the selected box, resetting random numbers, intermediate modules, and results.
This command should be launched on the main program window to reset all the graph before changing the memory or print options.
Displays the amount of free memory.
Allows to use the selected box in Probe mode. The box should not be connected and should have only one input pin and no output pin (see Debugging an error using the Probe mode). Launch this command again to exit the Probe mode.
Draws a red square on the wire or pin to which the probe was last connected.
Enters / exits the Automatic recalculation mode. If this mode is ON, all the downstream results are systematically updated when the graph is changed. If this mode is OFF, the results are either reset or updated, depending on the value entered in the Edit / Options / Calculations / Time threshold for automatic recalculation field.
Clears and recalculates the selected box. This command is equivalent to launching the Clear the box command followed by the Calculate (right click) command on this bow.
Warning : in this command is used on an intermediate module, the downstream results are NOT recalculated, even if the Automatic recalculation option is on, because only the selected module is recalculated.
Generates VHDL code from the MUSTIG graph, provided you have subscribed to this option.
Generates C code from the MUSTIG graph, provided you have subscribed to this option.
Closes all the visible windows except the first level program window
Close all the macros in the active graph
Closes all the visible windows associated with the active MUSTIG program, except the first level program window and the active macro.
Close all the macros in the active macro
Closes all the windows associated with sub-macros of the selected macro.
{ List of opened MUSTIG programs }
Displays a list of currently opened MUSTIG graphs, including the libraries. The active window is shown with a check sign. You may click on another name to select the corresponding window.
Displays a list of currently opened windows associated with macros. The active window is shown with a check sign. You may click on another name to select the corresponding window.
These commands allow to change the look of a text box or a text display module. The following features may be changed :
Warning : If these options are changed while no text box is selected, the modified options become the default options during the session. Any new text will have these features.
Displays a window featuring the current MUSTIG version and the name and address of the owner of the MUSTIG license.
Opens the general help window. This command is equivalent to opening the ![]() box on the front panel of the standard MUSTIG Library.
box on the front panel of the standard MUSTIG Library.
Displays general information about the last performed calculation and the current status :